Overview
In Kayako, there are predefined conversation or ticket views that you can modify and customize based on your team's filtering options. You may also create additional views depending on your need. For example, only the conversations assigned to you or a particular team, conversations of a specific priority, or conversations that are waiting on replies or in breach of their SLA deadlines.
Prerequisite
- To add or manage views in Kayako, you need an administrator account with the 'Manage views' permissions.
Information
You can use views to display any subset of conversations that meet the criteria you choose. They can be simple, like the examples above. But you can also define views using complex sets of criteria. For instance, you could use a view to display only pending conversations submitted by a specific organization that has been assigned to the sales team and are within an hour of their SLA deadlines.
Overall, views give you a lot of flexibility in how you look at your workload, which makes it easier to stay on top of everything that you and your team are juggling. There are many ways you might need to divvy them up.
Understanding How Views Work
Kayako comes out-of-the-box with several predefined views. In the admin area, if you click on the Views link in the sidebar, you see a list of all of the preset views.
The table below is a list of the default views and what they display. Note that this set of pre-configured views may differ based on the Kayako version.
| View name | Information displayed |
| Inbox (System) | The inbox shows every new or open conversation that either has been assigned to you or your team or has yet to be assigned at all. |
|
All open conversations in my teams
|
This view displays any conversations assigned to your team that are in Open status. |
|
My active conversations
|
This view displays any conversations assigned to you that are not in Completed status. |
|
Recently updated conversations in my teams
|
This view displays any conversations assigned to your team that have been updated in the past 36 hours by a user other than the Requester and whose status is Pending or Completed |
|
Suspended messages (System)
|
This view is a little different than the others — it shows any messages that Kayako has identified as spam or another type of automated message. Kayako automatically suspends these messages, without processing them into their respective conversations. From this view, you can review these messages and choose to accept them into Kayako or delete them permanently. Learn more in our article about suspended messages. |
|
Trash (System)
|
This view, the last system view, displays any conversations that have been deleted. |
You can tweak any of the views above to suit your team's needs. The '(System)' views, however, gives you a limited option for editing the settings such as the 'Columns' and the 'Sort order' only.
But on top of these predefined views, you also have the flexibility to build out custom views to suit your team structure, conversation tags, and overall workflows. It is useful to sit down and map out the sorts of views that would be most useful to your team. Think about which teams will need their views. Identify any specific priorities, organizations, or tags that you might want to monitor. Sketch out your workflows so you can build views for points along the path. Then, you will be in a great position to start creating custom views, which we will walk through step-by-step, next.
NOTES:
- Closed conversations will not appear in views, but you can search and filter for closed conversations using the 'Advanced Search' option on the search bar.
- Adding or modifying views are only available on Trial, Growth, Scale, and Enterprise plans.
- The Inbox plan does not have this feature which means that if you are to upgrade your Trial plan to Inbox, this feature would become unavailable.
- Creating nested views such as placing a sub-view or folder under a view is not possible.
For more information on what each pricing plan can do for you, please visit our site 'Simple and transparent pricing. If you are interested in upgrading your price plan, please send an email to sales@kayako.com for assistance.
To give you an example of a view that might be useful for your team, we are going to create a view for looking at conversations that have been escalated. We do not want the whole team to be able to see it, so we will restrict its visibility to the team we have created for just admin users. Plus, we will be relying on the SLAs and escalations we have set up already, which we will use to track the escalated conversations. Finally, we only want to see escalated conversations that have not been resolved yet, so we need to exclude any that have been closed.
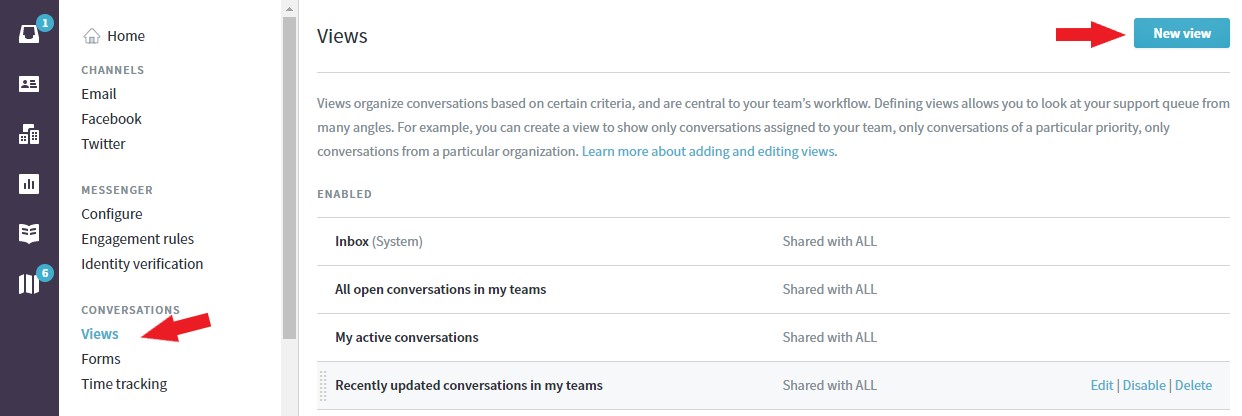
To add a new view:
-
Sign in to your Kayako and go to the admin area.
-
In the sidebar, click on Views.
-
Here, you see a list of all of the views that have been created. Click the New view button to create a new, blank view.
Note: You can also click any of the existing views to check their configurations and create similar views. Additionally, you can also use the Disable or Delete options when you hover over any of the custom conversation views (not for the default or system conversation views).
-
In the View Title text box, enter a name for your view. We are going to use 'Escalated Conversations.'
-
Since we want to restrict our view to admins, under 'Make this view available to' we are going to select Specific teams and then choose the name of the team from the dropdown. You can specify multiple teams as needed.
- Note: If an administrator with 'Manage views' permissions restricts the visibility of a view to ‘Just myself’, it will result in preventing everyone including admins from accessing or modifying that view (not even the ‘Owner’ role), so it is essential to make sure that only trusted users have the ‘Administrator’ role and are given the 'Manage views' permissions.

- Note: If an administrator with 'Manage views' permissions restricts the visibility of a view to ‘Just myself’, it will result in preventing everyone including admins from accessing or modifying that view (not even the ‘Owner’ role), so it is essential to make sure that only trusted users have the ‘Administrator’ role and are given the 'Manage views' permissions.
-
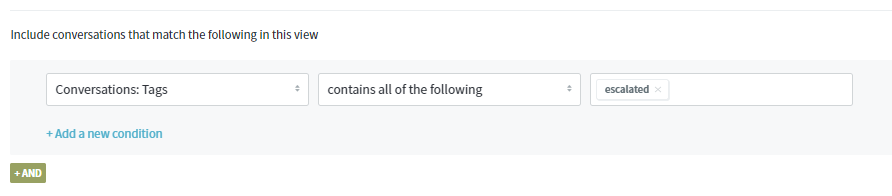
Next comes the important part: defining the view criteria. In the next section, click the Select a condition drop-down to expand it.
- Note: If you were to set the condition to only show conversations from a specific form, make sure that those conversations are assigned to those specific agents or to the teams that those agents are part of. Otherwise, agents will not be able to see the conversations in the view.
-
As you can see, there is a wide variety of conditions to choose from, but we want to filter for conversations been tagged as 'escalated.'
- From the Select a condition dropdown, choose 'Conversations: Tags' from the list.
- Click Select an operator to open the dropdown and select 'contains all of the following.'
- In the empty text box that appears, type in 'escalated' to specify the tag.
Note: This step depends on us having SLA-based automation set up to tag any conversations that have breached their deadlines to be tagged with 'escalated.' You can read more in our article about creating SLAs and escalations.
-
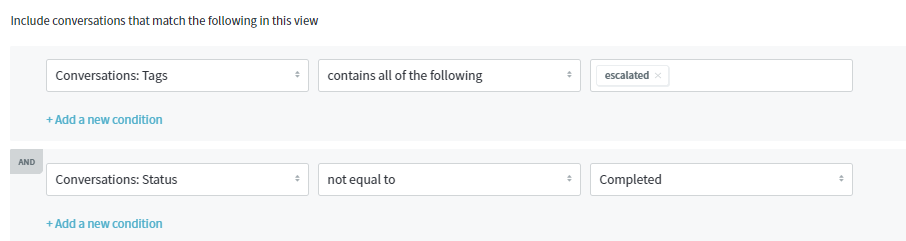
Click the +AND button to add your next condition, which we use to exclude any conversations which have been resolved already. Click the second Select a condition dropdown to open it.
- Start typing 'status' and select 'Conversations: Status' from the list.
- Click Select an operator and select 'not equal to.'
- From the dropdown that appears, select 'Completed.'
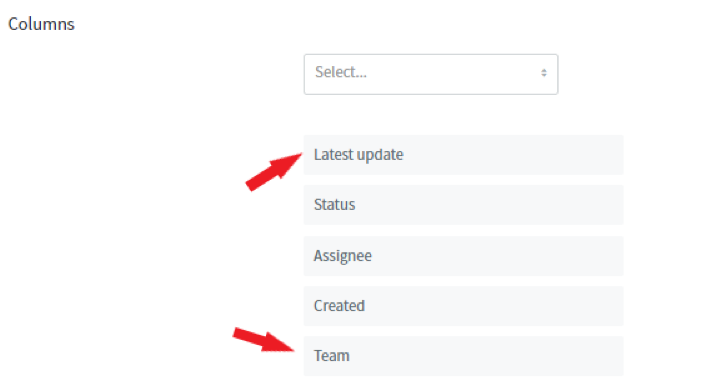
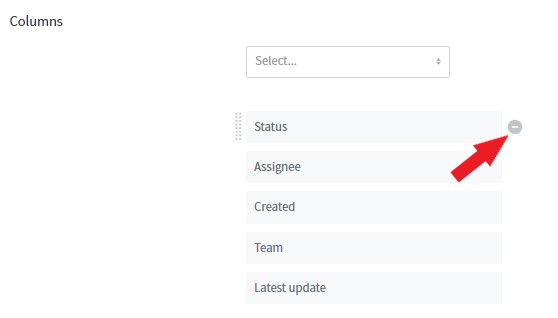
 NOTE: The steps above covers our conditions, but views also give you a lot of control over the types of information they display. Under the 'Columns' heading, you see a list of conversation attributes, each of which represents a column that will appear in your view.
-
Click the Select dropdown to open it, and select any other columns you would like to include.
- For our escalated conversations, we want to see which team they are assigned to, so click on 'Team.'
- We also want the date the conversation was last updated to appear in the first column, so click and drag the Latest update to the top of the list.
-
We are also not that interested in the 'Status' since we already know they are escalated, so want to remove that column. Hover over 'Status' and click the - button that appears to the right.
-
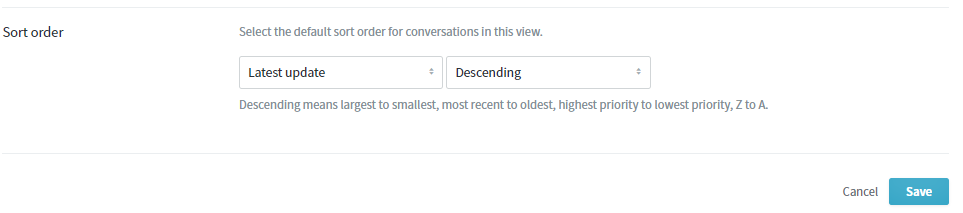
The last thing to do is select a column by which to sort your view results, under the 'Sorting order' heading.
Note: You can sort and resort your views by any column, on the fly, so there is not a lot of pressure here. -
For escalated conversations, it is important for us to see the conversations that have gone the longest without a reply, so select 'Latest Update (timestamp)' and 'Descending' to put the oldest at the top.
-
Click the Save button at the bottom of the page to create your new view.
Confirmation
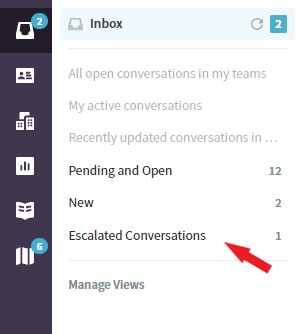
Now that your view has been created, switch back to the agent area, and you should see it in your sidebar.
ATLAS
Comments