Overview
If you don't want your user to set up a separate login credential for Kayako, you can enable single sign-on (SSO) authentication. This method checks your users' credentials against a remote authentication system or database instead of using the standard authentication mode that checks your users' credentials against the Kayako database. This is helpful if you are integrating Kayako with other applications and you want to authenticate your users for both applications using just a single remote authentication system.
Diagnosis
The standard authentication mode checks your users' credentials against the Kayako database where users will use their registered email address and assigned password on Kayako. You may prefer to use an existing remote authentication system to authenticate your agents and customers when they sign in to Kayako.
Prerequisites
- Login and logout URLs for your remote authentication service
- The Shared SSO Secret key that you'll set up to grant Kayako access
For help finding these, refer to the SSO implementation instructions over in our developer documentation.
Note: To edit your Kayako's SSO settings, you will need an administrator account with the 'Manage system configuration' permission.
Please note that neither LoginShare nor Active Directory SSO is supported in New Kayako. You can still use the new Kayako SSO API to build an adapter for your LDAP implementation.
Solution
-
Sign in to the admin area.
-
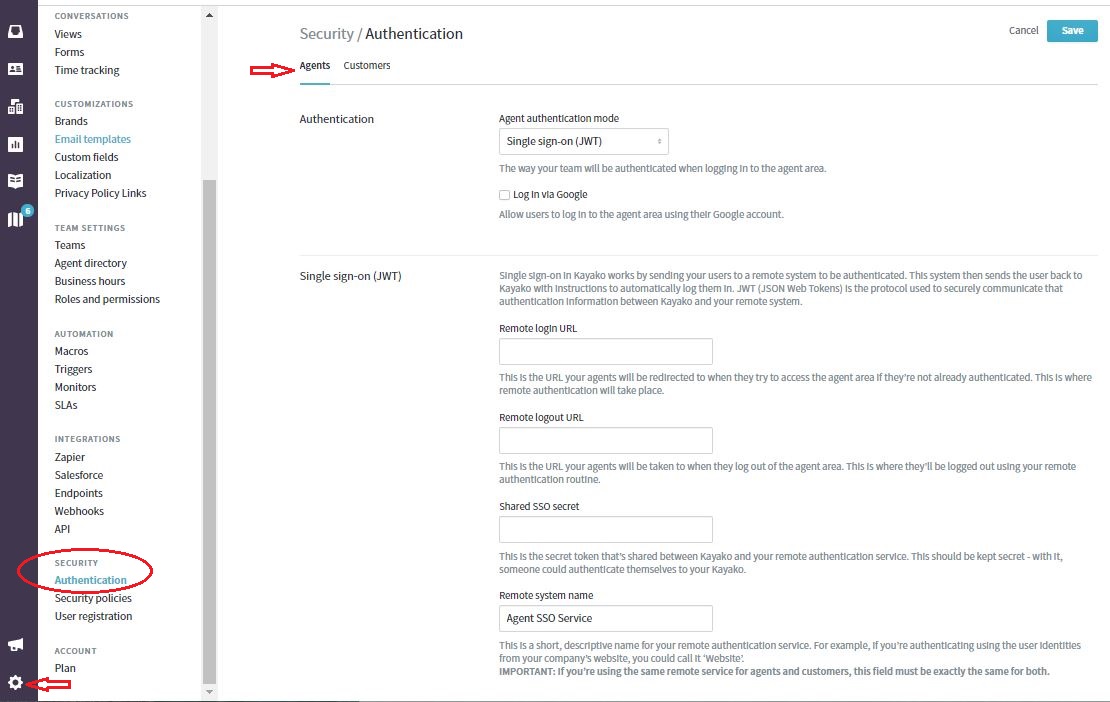
On the Security section in the sidebar, click Authentication.
-
Choose either the 'Agents' or 'Customers' tab at the top. The configuration options will be the same for both types of users.
-
From the Authentication drop-down list, select 'Single sign-on (JWT),' which will open up another set of configuration options.
-
Add the login URL for your remote system to the Remote login URL field.
-
Add the logout URL for your remote system to the Remote logout URL field.
-
Paste the token you've created for Kayako into the Shared SSO secret field.
-
Enter a short, descriptive name for your remote authentication service in the Remote system name field.
-
Click the Save button to save the changes.
Notes:
- On the same page, you can also set IP restrictions if you want to restrict access to the agent area to specific IP addresses only. The settings can be found at the bottom of the page.
- Remember, if you need more help with configuring SSO authentication, our developer documentation has you covered.
Confirmation
Once SSO is enabled, users will be prompted to enter their assigned credentials from your remote authentication system instead of the regular email address and password from Kayako.
ATLAS
Comments