Overview
When integrating Kayako with other systems, you have several options. In addition to Kayako's API and Zapier integration, you can also define custom endpoints, which enable you to send data from Kayako directly to external systems. Each endpoint specifies a specific destination outside of Kayako.
For example, let's say that every time a new conversation is created, you want to post the details to a particular Slack channel. You can define an endpoint for that channel and then build automation that creates a post anytime a new conversation is created.
Diagnosis
Understanding how Kayako uses endpoints
Using endpoints in Kayako consists of two steps. First, you create an endpoint for your target destination. Then you specify that endpoint in automation, which tells Kayako what data to send there, and when.
There are three types of endpoints you can create:
- Email — You can use email endpoints to specify a particular email address, which Kayako can then send automated messages to.
- Slack — Slack endpoints take advantage of Slack's incoming webhooks feature to enable you to post conversation information directly into a particular Slack channel.
- Webhook (HTTP request) — The webhook endpoint type enables you to send information from Kayako to the external API of any other piece of software you like.
Before creating an endpoint, you'll need to have either an email address, a Slack webhook, or the URL for an API call. We'll walk you through how to get and what to do with each, below.
Creating endpoints
Although there are three different types of endpoints you can create — email, Slack, and webhooks for external APIs — the process for creating them is quite similar. Remember, that the endpoint simply defines a destination outside of Kayako. You won't add any details about the type or format of the information Kayako should send until you specify the endpoint in automation.
Prerequisite
- To create endpoints in Kayako, you will need an administrator account with the 'Manage endpoints' permission.
- Destination email address for email endpoints.
- Slack webhook for Slack endpoints.
- Knowledge of the API for creating Webhook (HTTP request).
Solution
To create an endpoint:
-
Sign in to Kayako and go to the admin area.
-
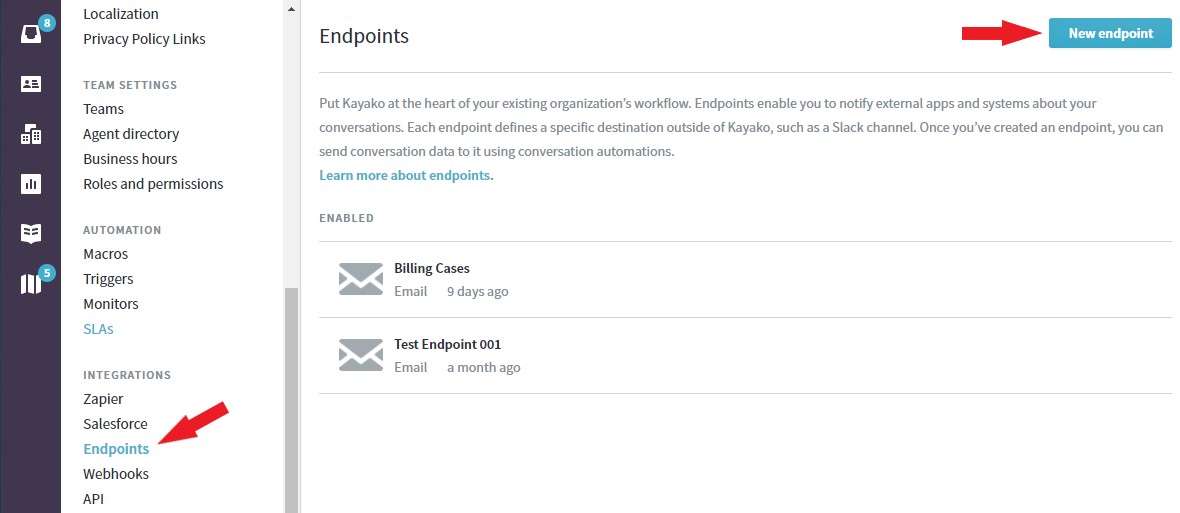
Click the Endpoints link on the sidebar menu.
-
Here you'll see a list of any endpoints that have already been created in your Kayako. Click the New endpoint button to create a new one.
-
From here, you have the option to create an Email, Slack, or Webhook endpoints.

-
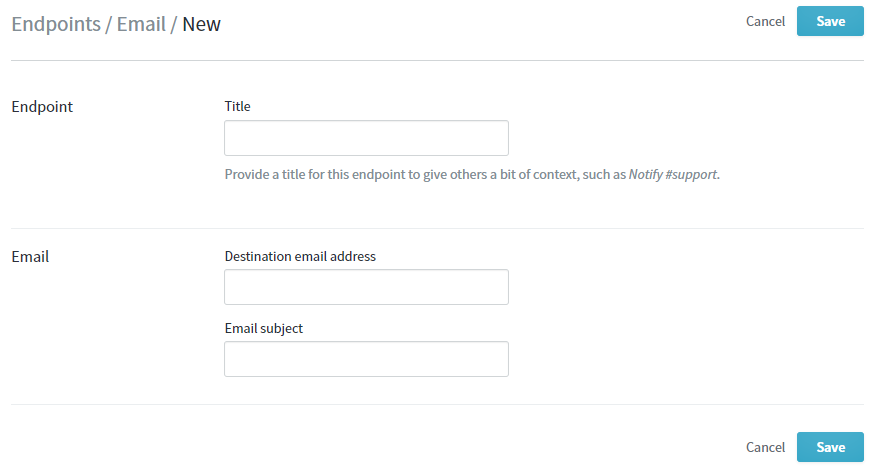
To create an endpoint that will send data in an email, click Email. Then when you've filled in all the details for your endpoint, click the Save button to create it.
- In the Title field, add a descriptive title for your endpoint.
- In the Destination email address, add the email you'd like to send your data to.
- In the Email subject field, add a subject for the emails you'll be sent to this address.
Note: You can use placeholders in your subject lines.
-
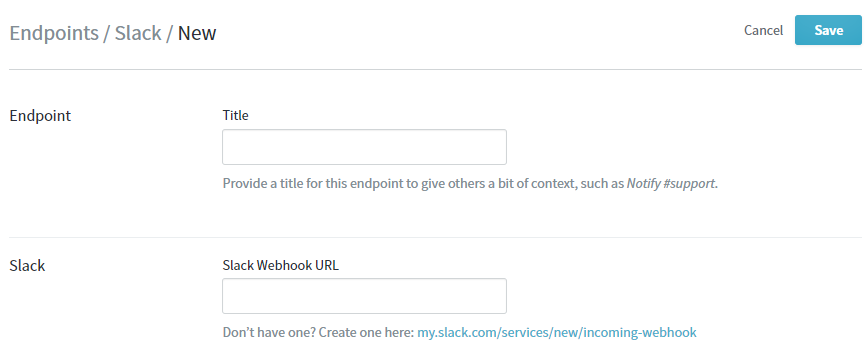
To create an endpoint to post data to Slack, click Slack. Then when you've filled in all the details for your endpoint, click the Save button to create it.
- In the Title field, add a descriptive title for your endpoint.
- Go to the Incoming Webhook Portal and follow the instructions there for creating a new incoming webhook.
Note: This step will require you to log in to your Slack account. You'll choose your destination channel when creating the webhook. - Copy the URL for your new webhook.
- Come back to Kayako and paste the URL into the Slack Webhook URL field.
-
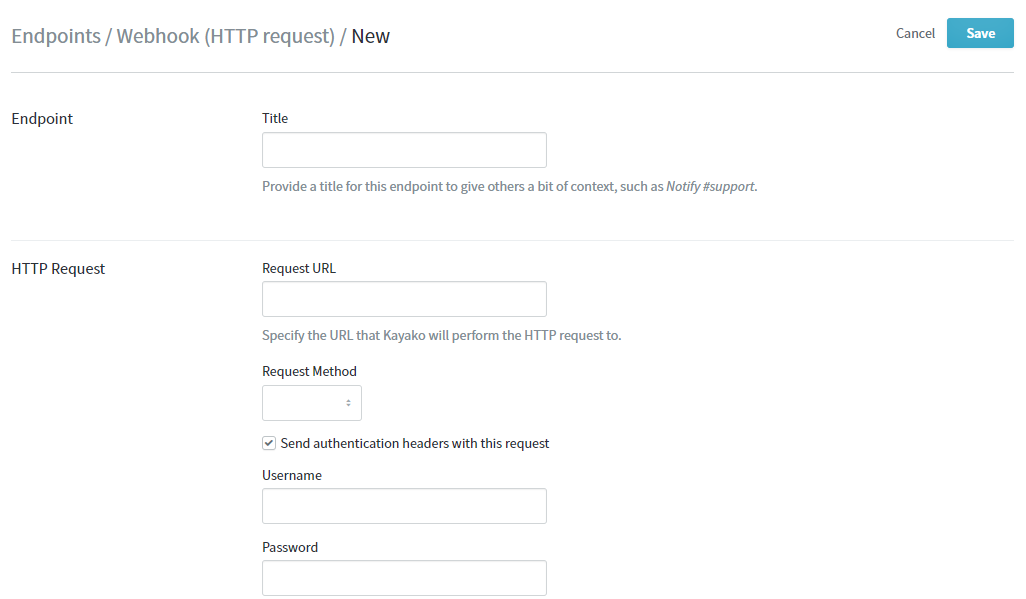
To create an endpoint that will push data to another API, click Webhook (HTTP request). Then when you've filled in all the details for your endpoint, click the Save button to create it.
- In the Title field, add a descriptive title for your endpoint.
- Pay a visit to the reference documentation for the API you're using.
- You'll need to find and copy the URL for the API call you'll be using.
- Come back to Kayako and paste that URL into the Request URL field.
Note: Most API requests will have some code that needs to accompany the request, to tell the destination system what to do with the data we're sending it. You'll be able to specify and customize that code when you create automation using this endpoint. - In the Request Method field, select the type of action you'll be taking, when pushing data to this endpoint.
- If the destination system requires you to sign in, before using their API, check the 'Send authentication headers with the request' box.
- In the Username field that appears, enter your username for the destination system.
- In Password, enter the corresponding password.
Testing
Now, to put your endpoints to work, you will need to set up a trigger or a monitor. So, when you are building automation, you can select your endpoint as action and choose what information you wish to send, and what format to send it in.
In case you are looking for API integration to set up reporting or other requirements, please head over to our Developer portal for more details.
ATLAS
Comments