Overview
Macros can save your team a ton of time by automating common replies or notes or even making common updates to conversation fields — all of which saves you valuable clicks. Macros can also help keep your tone consistent across replies from multiple members of your support team.
Whenever you find your support team repeating the same action or sending the same reply to one conversation after another, that's usually a good sign that you could use a macro.
Understanding what you can do with macros
Unlike typical 'canned reply'-style macros, Kayako macros can do much more than save reusable replies. In all, there are eight actions a macro can perform:
- Add reply text - Adds text to the reply box. The text can be edited before you send a reply to your customer.
- Set reply type - Sets the reply type to either a public message or a private note. If you do not set this, it defaults to a public message.
- Set Assignee - Assigns the conversation to a team, specific agent, or the current user. You can also unassign a conversation using this action.
- Change status - Updates the conversation status.
- Set type - Updates the conversation type.
- Add tags - Adds the tags you specify to the conversation. You can add as many tags as you like.
- Remove tags - Removes the tags you specify from the conversation. You can remove as many tags as you like.
- Update priority - Updates the conversation priority. You can either select a specific priority or have the macro increase or decrease the priority of the conversation by one level, for example, 'High' to 'Critical'.
<img src="" />). There's no direct way to paste an image within the macro editing panel.
Now that you have a sense of what you can do with macros, let's look at actually building one.
Prerequisites
- To create or edit macros in Kayako, you will need an administrator account with the 'Manage macros' permission.
Solution
To create a new macro:
-
Sign in to Kayako and go to the admin area.
-
Choose Macros from the left sidebar. You'll see a list of any macros that have been created.

-
Click Add new macro to create our new brewing instructions macro.
-
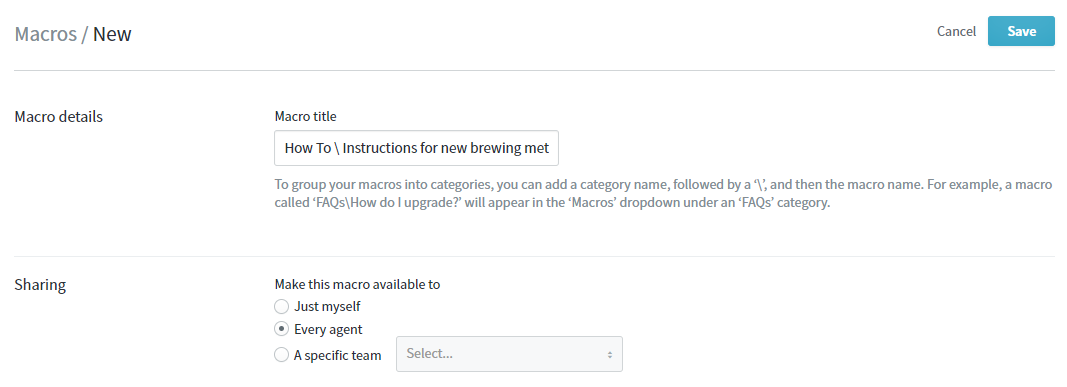
In the Macro Title field add a descriptive title so it's clear to your support team what the macro does. Let's go with 'Instructions for new brewing method'.
NOTE: If you’ll be using lots of macros, it’s useful to nest them into separate categories by adding a '\' to the beginning of your title. e.g. ‘How To \ Instructions for new brewing method’. -
Since we want our whole team to be able to use it, from the Make this macro available to list, select 'Every agent'.
NOTE: You can also limit the visibility of a macro to just yourself or to a specific team.
-
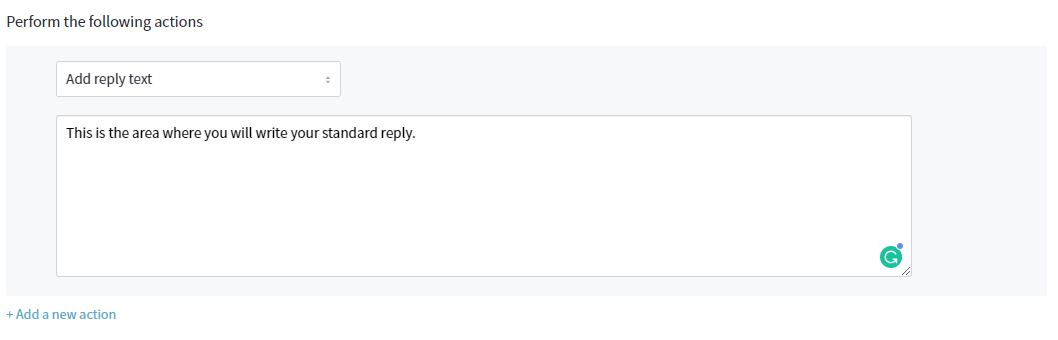
Next, we're going to add the actions our macro is going to execute. From the Please select an action dropdown, select Add reply text.
-
In the box that appears, write up your standardized reply, in this case, the instructions for your new brewing method.
NOTE: You can personalize your macro replies using placeholders like {{case.requester.first_name}}. You can read more about placeholders in this article.
-
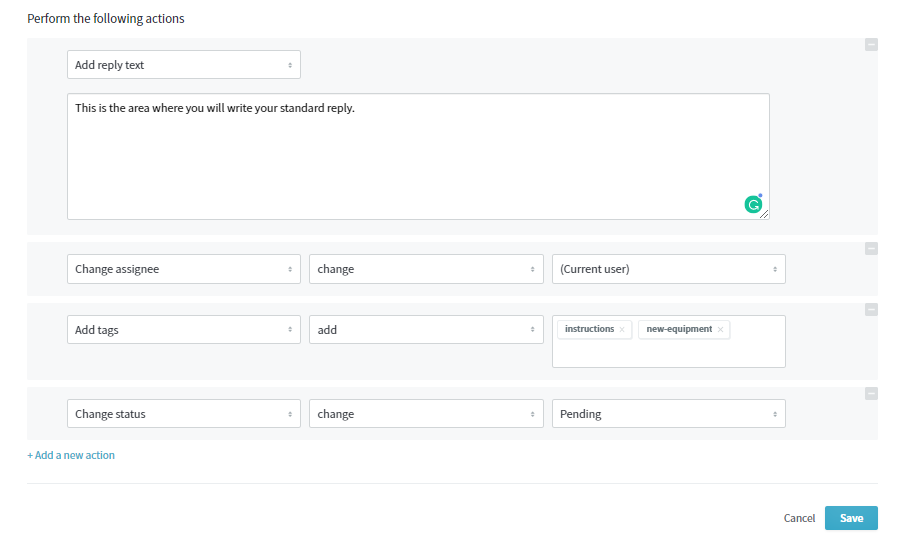
Click the +Add a new action link. From the Select an action dropdown and select Change assignee.
- From the next dropdown, select change.
- From the last dropdown, select (Current user).
-
Again, click the +Add a new action link. From the Select an action dropdown and select Add tags.
- From the next dropdown, select add.
- From the last blank field, add a few descriptive tags to make it clear what these conversations are related to. In our example, let's use 'instructions' and 'new-equipment'.
NOTE: You can add as many tags as you like.
-
One last time, click the +Add a new action link. From the Select an action dropdown and select Change status.
- From the next dropdown, select change.
- From the next dropdown, select Pending to set the conversations to 'Pending' when the macro runs.
- And that should do it! Click the Save button to create your new macro.
Testing
Your team will now be able to use the macro when replying to conversations. Once you've defined one or more macros in Kayako, they'll be available to use when replying to a conversation.
To apply a macro to the conversation:
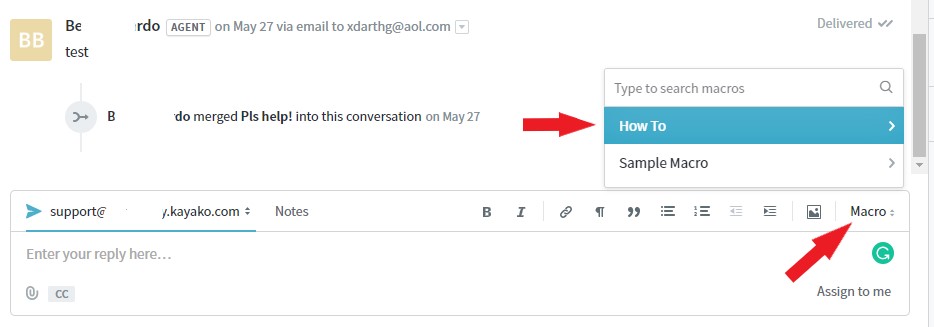
- When looking at a conversation, click the Macro dropdown on the top right in the agent reply area.
-
Search or scroll to the macro you want and click to select it.
-
Review the conversation and make the necessary edits or changes.
-
If you're happy with the changes, click Send and update to update the conversation.
- NOTE: You will notice that the tags 'instructions' and 'new-equipment' will be auto-added and the status will be set to Pending.

- NOTE: You will notice that the tags 'instructions' and 'new-equipment' will be auto-added and the status will be set to Pending.
ATLAS
Comments